

Fermented Hot Sauces!
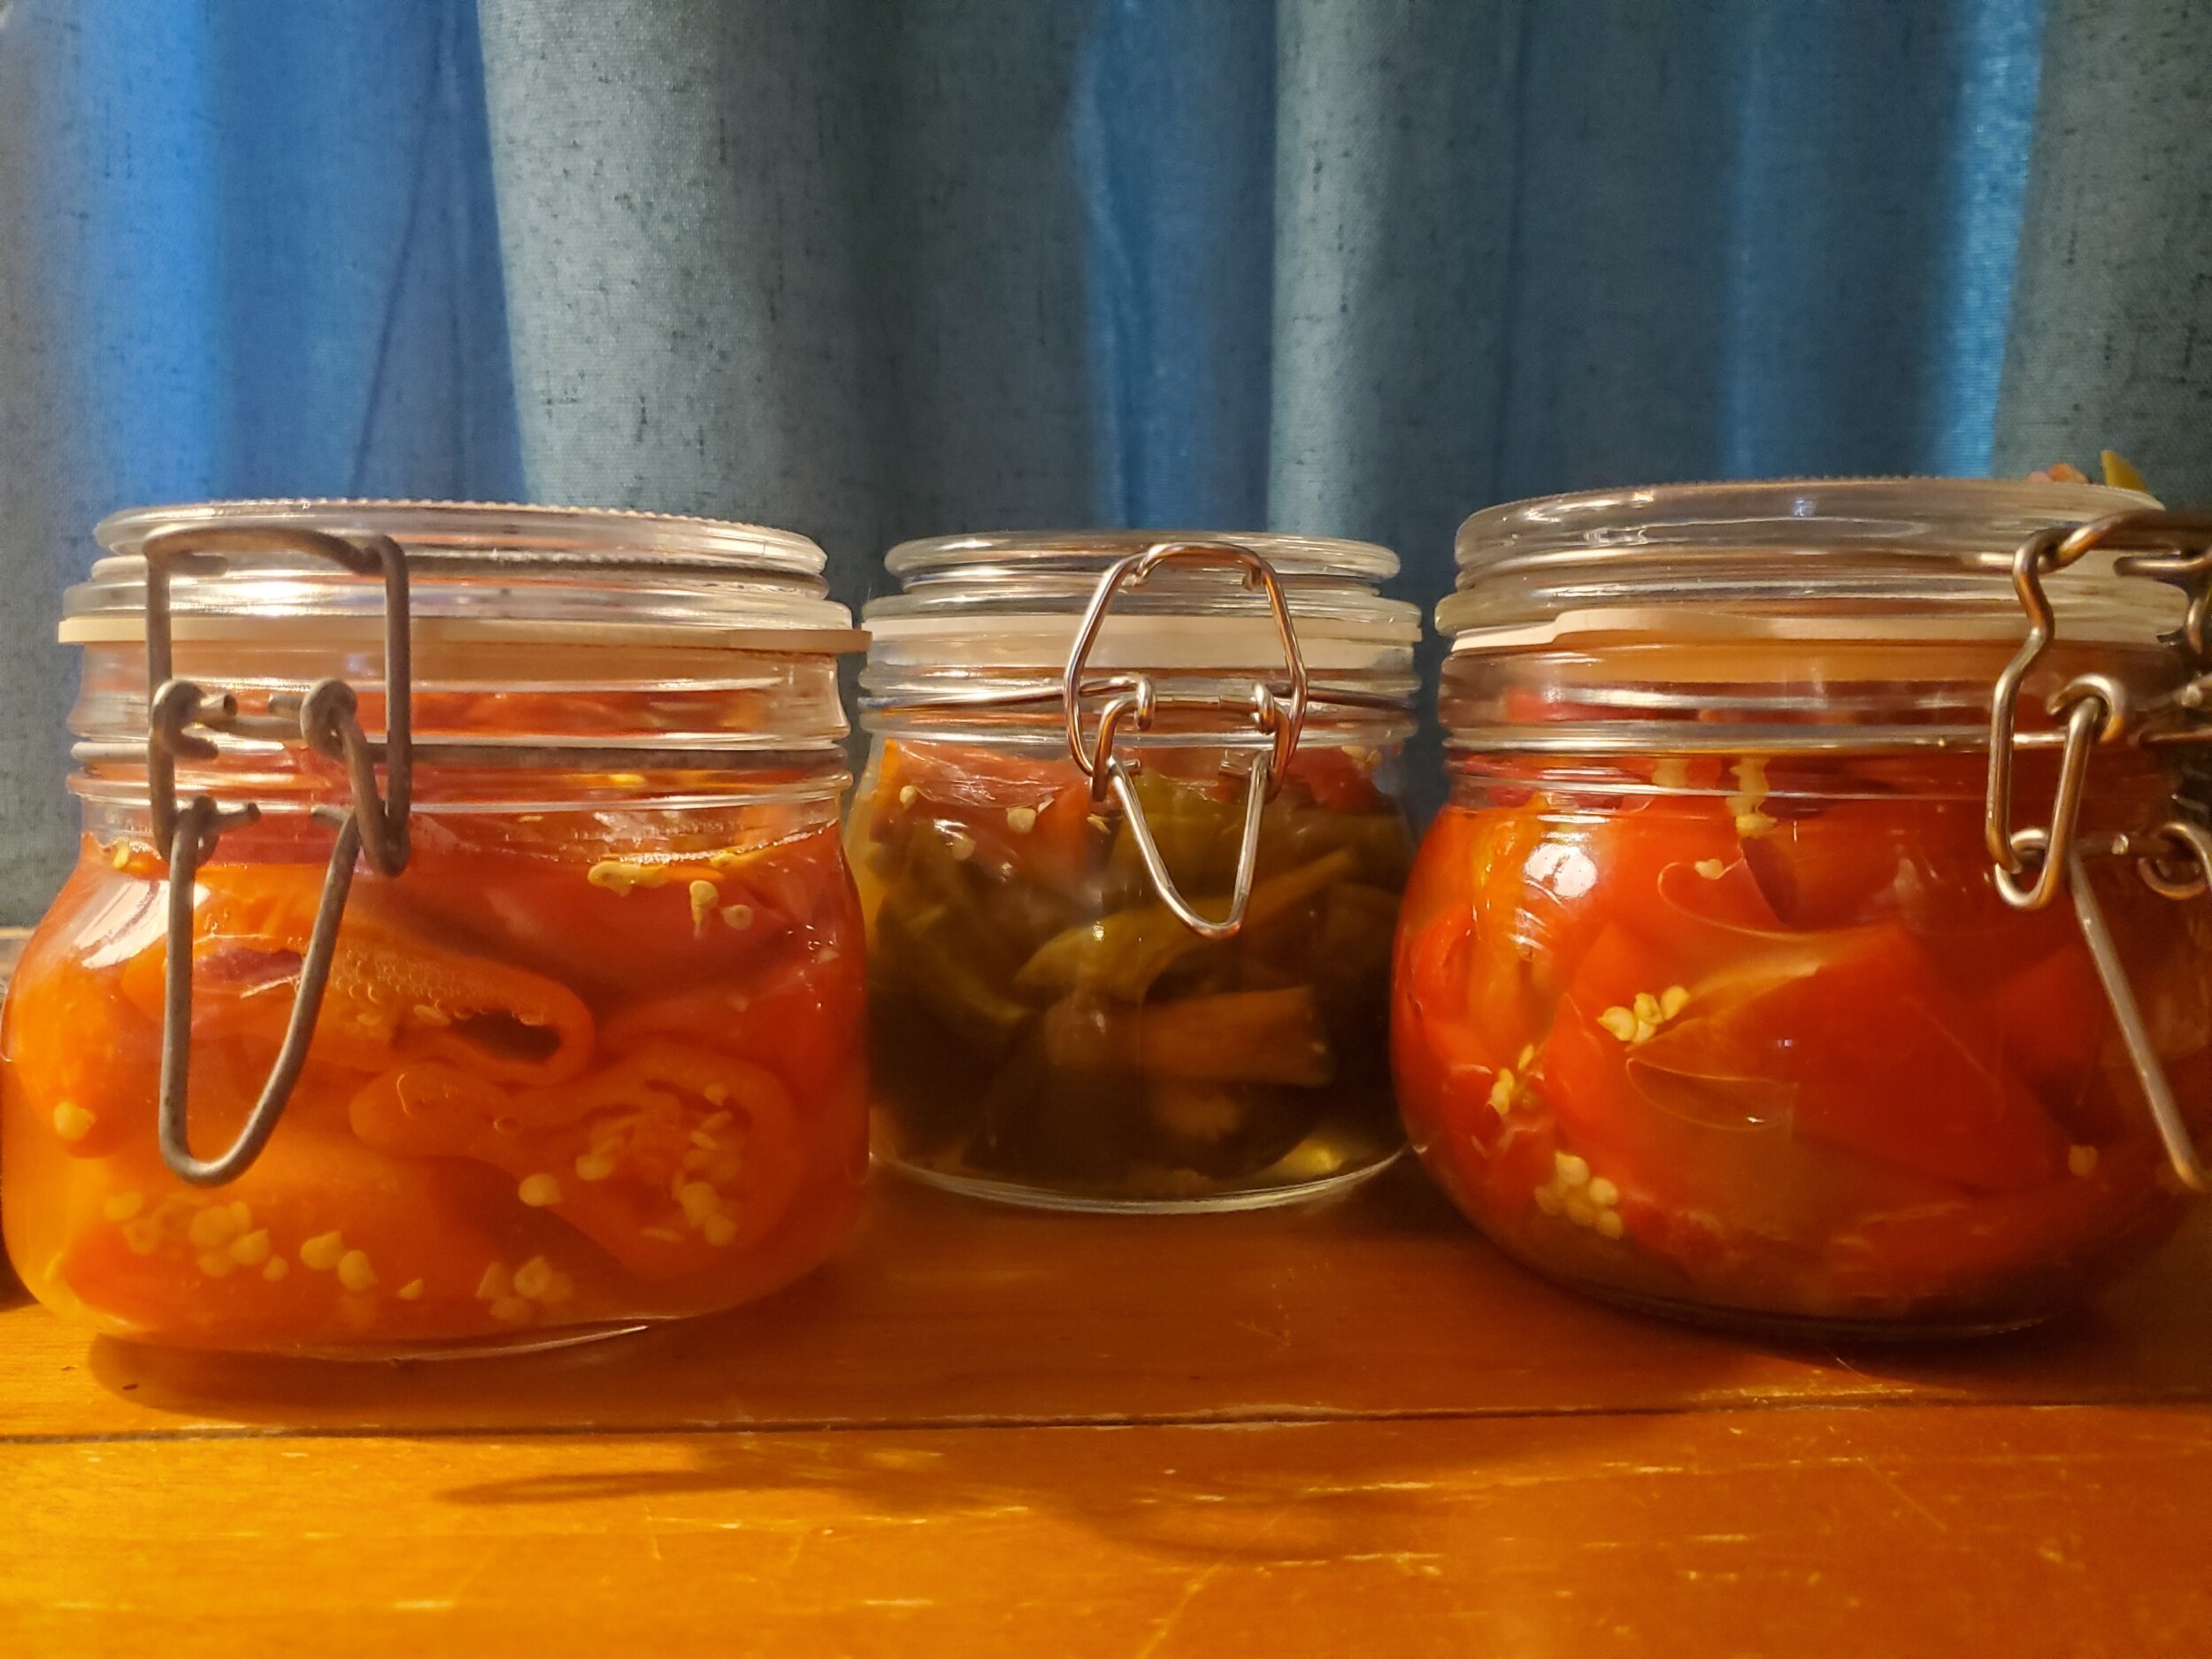
As of when I was writing this (25 August, as I like to stay ahead in my posting schedule so I have more time to develop ideas), the left and middle jar were put together on 30 July, and the right jar was 1 August. So this is 25-27 days into fermentation.
I went to look to see if I told y’all how to make fermented hot sauces in the post on how to make vegetable ferments, and I discovered that I gave a method but didn’t go into much detail on that. Today is the day! Mostly it’s the day because I put a few jars of Hatch chiles to ferment into the pantry, so it’s a good time to teach y’all what to do if this is a thing y’all are interested in making. Also the day because I wanted to teach my friend Brandon (late August, when this was written) how to do this, so it seemed easier to double dip by only writing it once and sending him screen shots of this before it goes live.
This is a really long post. Fermented hot sauces are not hard to make, but it does require a lot of detail so you understand the process and safety-related information.
Most important
This requires a 10% brine. That means that for every litre of water, you’ll dissolve 100g of non-iodized salt into it. My method is to boil the water, whisk in the salt until it’s dissolved, and wait for it to cool to room temperature before adding to my jars. You technically don’t need to wait, and sometimes I’ve got a busy day so I don’t wait, but be aware that this will slow your fermentation down a lot if you don’t let your brine cool.
Please cut your chiles up at least a little. If you toss them in whole, not only will you get some next-level bitterness from the stems (yes, the stems), they’ll also be really hard to keep down in the liquid. Because they’ll float. Floating is bad. It’s less bad if you’re using a fermenting jar, though, because hermetically sealed. I tend to cut each chile into 3-6 chunks once it’s destemmed, depending on how big the chile is.
Make sure, if you’re using fermenting jars, that your wire attachments are still pretty tight (this isn’t relevant for Weck because your metal bits are flips rather than baling wire). If the baling wire isn’t tight everywhere it should be, you have to manually adjust them. I’ll put a video on that down below, since I think people who are good at this (not it!) should be the ones explaining it. Also make sure your gasket is in good shape. You’ll get mold in the jars where this isn’t true of one or both of those. Don’t ask me how I know, because y’all already know how I know. Had to throw away some chiles that were moldy, that’s how. Actually, that’s not the first time I’ve tossed stuff because I didn’t do this or have Ross do it for me. Video will also show you how to test your jars.
If you’re not using fermenting jars and are instead using Mason jars or jars saved from stuff you bought and ate already, you really need some fermenting weights. If you have special attachments for Mason jars, you already know if you still need weights or not, so do what you need to.
Red chiles are usually hotter than green ones. If you want a milder sauce, you’ll want to remove not just the seeds, but also the membranes that follow along the length of the chiles. It’s the membranes that are spiciest, not the seeds (they’re second spiciest), so get them both out if it needs to be a mellow sauce.
Note also that the more you cut a chile, the spicier it becomes. This is because more cell walls are broken that contain capsaicin, so more is released into your mix. It’s exactly like onions, where more cuts means more tears! So you’ll make more or less cuts depending on what you’re looking for from the spice level. When I make pots of chili and want to include stupidly spicy ones, I stick those in the pot whole and pull them out later. All the flavor, very little of the spice! If you’re gonna do whole chiles, weigh them down!
You can add any spices you feel like. Do some experiments and let us know what worked really well for us in the comments!
When you’re done handling the chiles and are washing your hands, wash them twice in cold water with soap. I just use dishsoap, because that’s all I’ve got near my sink. Cold water matters, because warm or hot water opens your pores so more capsaicin gets into the skin. This means when you rub your eyes later, it’s still gonna hurt despite two washes. Cold water stops that from being a problem.
Here’s what you’ll need
Hardware
Jars for your chiles, possibly also weights
Spoon or whisk
Measuring cup for brine
Muddler, rolling pin, wine/similar bottle, or spurtle (optional) - I use whichever of these is closest to my hand to smash my chiles in tight
Knife
Cutting board
Blender or food processor (manual or electric; can also use a mortar and pestle if preferred)
Software
Chiles - any kind, any amount; this is 100% up to you and how much you’d like to make! I know a lot of y’all really do prefer to have specific measurements, but I can’t give them because I don’t know how much you want to make, nor how big your jars or (or how many of them!). Just go with it, because it really will make sense as you’re destemming chiles, lightly chopping them, and packing them into your jars.
Salt - any kind of salt that doesn’t have iodine added; this can be as inexpensive as grocery store free-flowing salt or as expensive as you fancy sea salts. You are not measuring your salt with respect to how many chiles are involved; you’re measuring with respect to the water. It’s 100g per litre or quart of water. Scale up or down as needed.
Optional add-ins: spices, garlic cloves, slivers of onion or shallot, whatever you think might taste good, whether fresh or dried spices.
Vinegar - this gets used at the end, and is to slow down the fermentation. It also gives a nice flavor. Use whatever vinegar matches the flavor profile you’re looking for from your hot sauces.
Here’s what I did for software
Hatch chiles; mostly red, but some green so I could make some for my neighbors, who prefer green hot sauces.
Salt - I used Colima salt, because I have a lot of it and it’s not my favorite. It’s not my favorite because the large size of the salt makes it impractical for a lot of things I want salt for. It’s lovely for fermenting, though, and many other applications!
Water - I’m just gonna say it: I use tap water for this. And I live in the Houston metroplex, where the water isn’t nearly as good as it should be in a metroplex of this size.
Spices - I used whole garlic cloves in each (1-2 per jar). My mold jar also had coriander, black peppercorns, and cumin seed in it. You really can put whatever you want in there; a little ginger or cinnamon might be nice, but you really can use any spices you feel like. If you’re not sure how that will go, do those in smaller jars so you don’t have more than 1-2 cups you’ve got to figure out what to do with if you don’t like how it came out. Most of my hot sauces don’t contain spices other than garlic, so really just do what you want with this.
Vinegar - I use apple cider vinegar here, but any vinegar is fine. I add a splash at the end to slow fermentation. My splashes are 1-2 tablespoons. if you want less, please use less. All it’s doing is adding flavor and slowing fermentation, so it doesn’t matter if you decide not to use any at all.
Critical Safety Note!
When this is all done, you really do need to keep your hot sauces in the fridge. I’ve had a room temperature hot sauce explode and get into my eye (the sauce, not the jar), and I can say with certainty that it wasn’t fun. I guess I should just tell the story, so y’all have the full scope of how completely no this would be for you:
While preparing holiday gifts during the winter of 2019 (the Before Times! Remember those?), I set out two bottles of hot sauce to pour into my gift jars. I didn’t get around to doing this part of the gifts that day, and I also forgot to put them back in the fridge.
Next day, Ross is at work, I’m panicking that my gift bags aren’t done yet, and I shake and open one of the jars. Everything is fine. I don’t understand why I shook these before burping, but it is what happened. Actually, I do know why. I don’t strain out my solids from my hot sauces, so when I grab a jar out of the fridge to put on whatever food I’m eating, I shake the jar so it’s not just liquid sauce on top and solid sauce on the bottom. Straight from the fridge you can shake. Room temperature is a bad idea.
Second jar was a swing top. Shook that one too, didn’t put a cloth over the opening in case something went wrong as I fully know I should always do, and flipped the baling wire for the lid up. Mistake.
At least a quarter of the hotsauce blew out of the bottle, and some of it got on both of my eyeballs. I dabbed as much as I could off my eyes with the cloth I had near me, then closed my eyes (not tight; just regular closed like you’re blinking or sleeping), walked over to the spice racks, grabbed my baking soda, then walked back to the kitchen and set it down on the counter near the sink so I could feel where it was more easily once I got a bowl out. Groped around in the cabinet for a bowl, got it, dumped in some baking soda, added water, and stirred until the water felt like the right texture. Then I got the bowl on the counter part of the sink, opened my eyes, and washed them with the solution until I couldn’t feel them burning anymore. Then I rinsed with fresh water from the tap until I couldn’t feel grit on my eyeballs anymore.
As you might expect, this was a bit traumatic for me. It was also traumatic for Child Tester, because as I was groping my way to the spice rack, she called out for help with something. I yelled that I couldn’t help her right then because in the middle of an emergency, and said she should stay in her room.
She did not stay in her room, so when I could see again, I saw her standing quietly in the dining room, mouth agape, and having seen nearly everything I did to save my eyes. She was really scared, and scared enough that she kept quiet because she understood it might be harder or impossible for me to fix this if I knew she was there and was distracted by her presence. I’m really sad she saw all that, despite it having been an exceptionally good lesson on why safety protocols matter.
There was hot sauce all over my kitchen, in the pantry, on the ceiling, everywhere. Just everywhere. It took ages to clean it all up, and some of the wall and baseboard surfaces were stained. I always made it a point to look at them whenever I was considering doing something else that was dangerous and dumb, and it stopped me every single time from carrying out my idiotic plans.
My eyes are totally fine, but this could’ve gone a lot differently for me. If this happens to you, you should not use the method of fixing it that I used. I did this because I didn’t want to use dish soap (that seemed somehow more horrible than what I chose), and because I knew that part of our home well enough to be 100% confident I could do it both quickly and blind. I also knew I would be able to feel when I had diluted the baking soda enough; there was a pile of baking soda in the bottom of the bowl that didn’t dissolve, and that’s because I really could feel the right dilution. I would call this success to be a result of a solid knowledge base coupled with an extraordinary amount of luck. Luck was the main factor in me getting every step of that treatment right, and had luck not been with me on the baking soda, I probably would have irreparable damage from the incident.
Baking soda comes with risk, though, and that risk is that it can scratch your eyes and cause permanent damage. Use the dish soap if this happens to you, because it’s safer. My friend Cassie has needed to dish soap her eyes one one occasion (I guess everyone learns after the first round of horror), and her description sounded worse than what I endured, but it is the safer choice for that kind of situation.
The tl;dr (too long; didn’t read) here is that if chiles get in your eyes, wash them out with dish soap and then go to the doctor once the most critical part of the emergency has passed. Also, do not store these at room temperature or they will explode. That’s really the important takeaway here.
Here’s what you’ll do
Boil water, then add 100g of salt for every litre. I’m going to be honest here and say that when I’m using a measuring cup that uses quarts instead of litres, I still do 100g for the quart. I never do this more than a pint at a time unless I’m really making a lot of hot sauce, because I’ll feel compelled to save any leftover brine otherwise so as to not be wasteful. Y’all know I’m obsessed with preventing waste, so I do 50g/pint of water at a time.
Let the water cool. Or don’t, if you don’t mind your hot sauces taking around double the time to get going that they’d need with room temp brine. This doesn’t double the total ferment time, but rather just that initial period winds up taking a week or so before you really start seeing the bubbles.
While all that jazz is going on, go on ahead and destem and chop your chiles. Put any flavorings/spices you’re adding in the bottom of the jar, and then pack your chiles in as tightly as you can. I generally fill the jar about a third of the way with chiles and then tamp them (if you smoke a pile, it’s identical to the process you use with your tobacco filling and tamping), then continue along until it’s full. Smaller amounts tamped frequently will always get you a tighter pack than larger amounts tamped infrequently.
Now, you add the brine! Please leave at least an inch of headspace at the top of the jar. You may need a plate under your jars during the early days where it’s fermenting anyway, but you definitely will need one to catch leaks if you don’t leave adequate headspace. Brine all of your jars, let them sit for 5-10 minutes, then top off the jars that need it with more brine. Put your weights in if you’re using those, then seal the jar in whatever manner is appropriate for the type of jar you’re using. Write the date on the top of the jar, and I also like to write what it is and what went in it. I also write what kind of salt I used, in case I particularly like how a given salt interacts with the flavor profile. But them in a closet, pantry, cabinet, or somewhere else that is dark and cool.
Wait Time!
If you like a really young hot sauce, you can pull these at 2 weeks. I never leave mine for less than 3 months, because I like to get as much nuance in the flavor as possible. Hot sauce is more about flavor than heat for me, so the time it takes for the flavor profile to really develop is important for the ones I make. I am the only person in the house that eats my hot sauces, because I eat about 5 times as much chile as Ross or Child Tester do, so they find them too spicy. I eat a lot of hot sauce, though. I’ve left these to ferment for up to 8 months, and I find that after the 6 month mark, they develop a much stronger sour note that I am not a huge fan of. Those sauces I tend to cook with rather than use as a condiment.
Whenever it is you’re ready to pull them, once you do, you’ll dump your jar’s contents (one jar at a time) into the blender, and add that vinegar if you’re using it, and then blend it up like it’s a smoothie.
NOTE: if you did use spices other than garlic and/or some kind of onion, I advise you put those spices in a tea bag or similar so you can simply pluck the bag out instead of having to pick the spices out before blending. You also could, I suppose, leave them and let them get blended too. I have never done this, so I can’t tell you if it causes an off-putting texture in the final product. If y’all try blending with the spices still in there, please let me know in the comments how it went for you.
Some of you may want a really thin sauce, and if that’s you, put it all in a strainer bag or fine mesh strainer with a bowl under it to catch the good stuff. This could take a while, so consider this to be a part you can walk away from and come back whenever you feel like it. 2 hours should be good, though.
If you prefer a thicker sauce but not as thick as it’d be if you kept all the solids in there, do what the thin sauce people do. Just do it for less time. You can always add solids back in if you strained it completely, too.
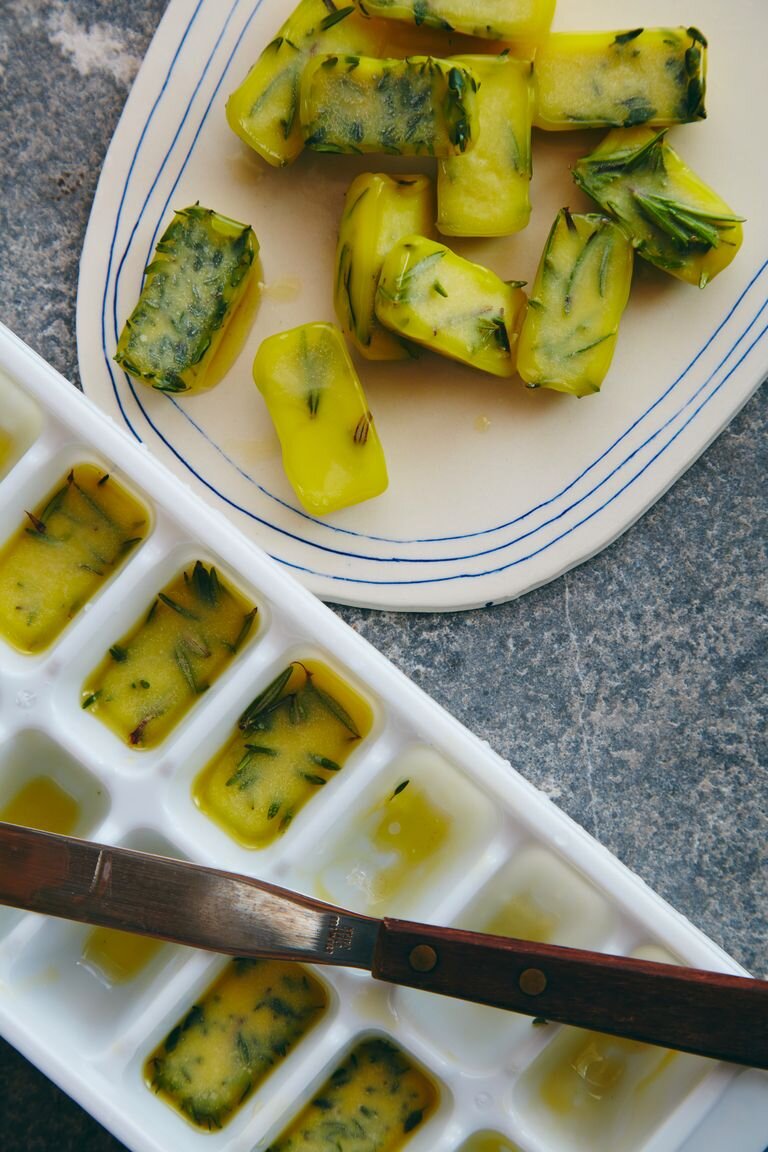
If you prefer a thick sauce (me!), bottle it as soon as it’s fully blended. Whatever thickness or thinness you prefer, bottle it when you’re done straining, or not, the solids out. Those strained solids can be composted or thrown away, or you can freeze them in ice cube trays and use those solids in your cooking. It would also be pretty tasty if you added olive oil or similar to the ice cube trays, as many people like to do with freshly chopped herbs.

Both of these pictures come from The Pioneer Woman’s tutorial on freezing fresh herbs in olive oil. It’s a really comprehensive tutorial, for those of you who’ve never done this before, and it’s as entertaining as all her other writing is! Because these two pictures are from the same post and this picture occupies substantially less space in the post, I’m only captioning this photo to give credit for both pictures.
Again, once bottled, put them in the fridge! Save your eyes, your ceiling, your walls, your pets, save everything from a chile shower!
Now, it’s ready to use! Most of the time I make this only once per year, because Hatch chiles really are my favorites. You can make them year round, though, and you can also make them with your favorite dried chiles! Hope y’all enjoy these hot sauces, and let us know if you’ve got other tips or tricks to add to this!

This is how much hot sauce I have left. I’m certain I can’t ration this long enough for any of my new jars to be ready, which makes me a sad panda. I might actually have to buy hot sauce to get me through until one of them is ready! Spoiler alert: it’ll be the left jar that’s ready first, because I’m going to pull it early. When I run out, and how I feel about buying stopgap sauce, will determine how young that one is when I start eating it.